Maitake mushroom salad

This warm, simple salad is so special thanks to the maitake mushrooms and the variety of textures and flavors. Made from expensive ingredients, this salad is meant for special occasions (or just the occasion of treating yourself), but I promise it’s worth it! #meandthemoose #salad #maitakemushrooms #warmsalad #saladrecipes #sidedishes

This warm, simple salad is so special thanks to the maitake mushrooms and the variety of textures and flavors. Made from expensive ingredients, this salad is meant for special occasions (or just the occasion of treating yourself), but I promise it’s worth it!

Take me to the recipe!

This warm, simple salad is so special thanks to the maitake mushrooms and the variety of textures and flavors. Made from expensive ingredients, this salad is meant for special occasions (or just the occasion of treating yourself), but I promise it’s worth it! #meandthemoose #salad #maitakemushrooms #warmsalad #saladrecipes #sidedishes

This salad is based on my best memories from a tiny little restaurant in Brooklyn called Little Dishes that I used to frequent with my husband before it tragically closed. I remember running to this place in the thick snow when someone was having a craving for their Mac and cheese. Their food was so simple, but so thoughtfully prepared that the dishes ended up being much greater than the sum of their humble parts.

This warm, simple salad is so special thanks to the maitake mushrooms and the variety of textures and flavors. Made from expensive ingredients, this salad is meant for special occasions (or just the occasion of treating yourself), but I promise it’s worth it! #meandthemoose #salad #maitakemushrooms #warmsalad #saladrecipes #sidedishes

This warm, simple salad is so special thanks to the maitake mushrooms and the variety of textures and flavors. Made from expensive ingredients, this salad is meant for special occasions (or just the occasion of treating yourself), but I promise it’s worth it! #meandthemoose #salad #maitakemushrooms #warmsalad #saladrecipes #sidedishes

Maitake mushrooms, sometimes called Hen of the Woods, are my absolute favorite variety. They’re meaty and slightly herby with a wee bit of forest floor funk. I state from the outset that this is an expensive salad because maitakes definitely don’t come cheap and I wouldn’t substitute any other mushroom variety here. I mean, you CAN, but your salad with end up fine, instead of ethereal.

The original recipe used a local cheese that was somewhere between parmesan and gruyere. Use either in this recipe or any other favorite cheese that falls in the nutty, slightly dry realm.

This warm, simple salad is so special thanks to the maitake mushrooms and the variety of textures and flavors. Made from expensive ingredients, this salad is meant for special occasions (or just the occasion of treating yourself), but I promise it’s worth it! #meandthemoose #salad #maitakemushrooms #warmsalad #saladrecipes #sidedishes

A couple of notes:

  • Cooking the mushrooms: I like to leave the mushrooms in slightly large pieces. It will feel awkward to cook them at first because they’re pretty stiff until they heat up somewhat. Once you sear them on one side, the mushrooms will get much floppier and easier to cook.

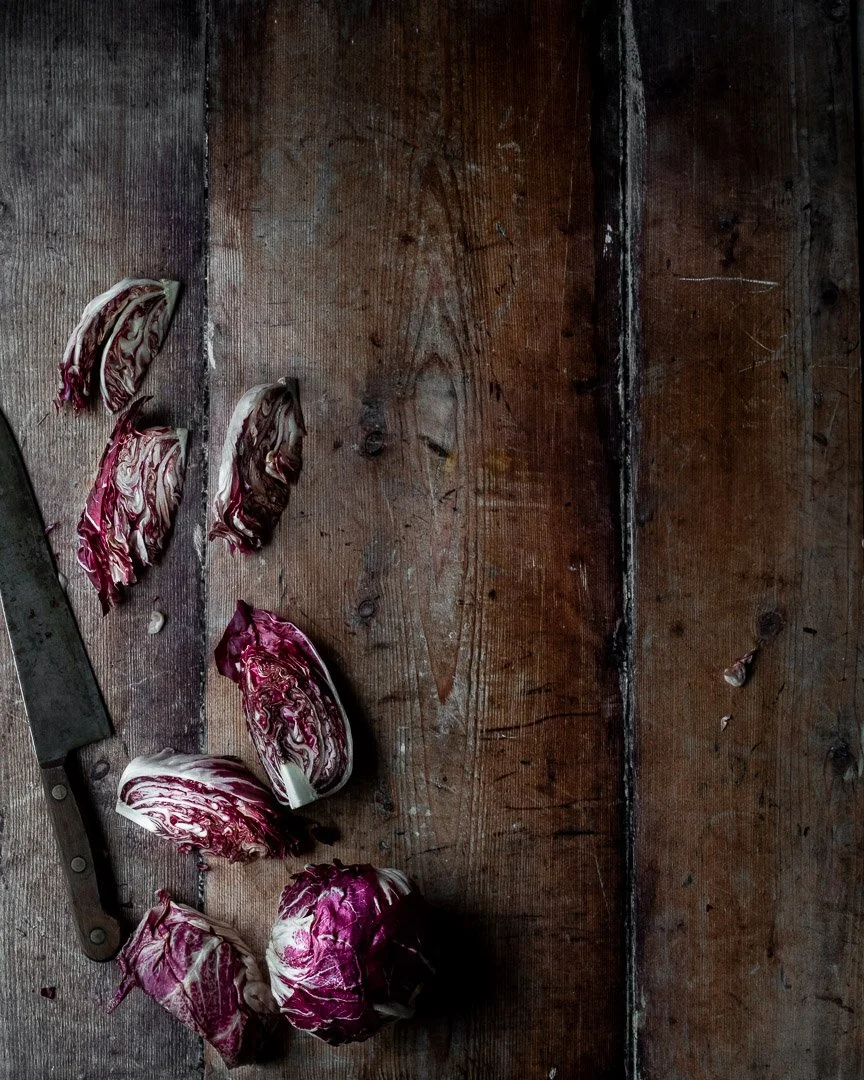
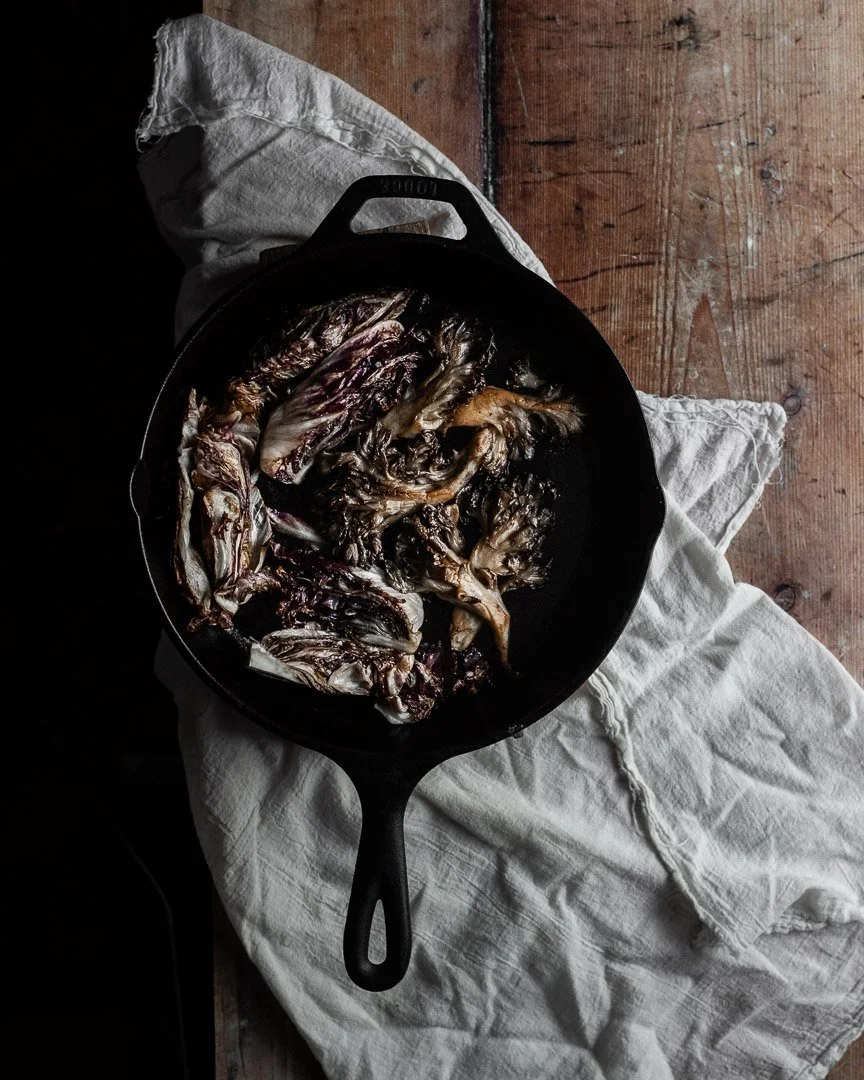
  • Cooking the radicchio: I seared half of the bitter lettuce and left the other half raw for a bit of textural difference, but you don’t strictly need to do this step. I left the lettuce in pretty large pieces for the photos, but definitely slice them much thinner for the real salad.

This warm, simple salad is so special thanks to the maitake mushrooms and the variety of textures and flavors. Made from expensive ingredients, this salad is meant for special occasions (or just the occasion of treating yourself), but I promise it’s worth it! #meandthemoose #salad #maitakemushrooms #warmsalad #saladrecipes #sidedishes

Maitake mushroom salad

2-3 large maitake mushrooms, each cut into about 4 large pieces
1 small head of radicchio, sliced into very thin wedges
1 Tbsp butter
1 Tbsp olive oil
4-5 cups arugula (1 small bag of pre-washed lettuce is perfect)
Shallot vinaigrette (recipe below), to taste
Parmesan or gruyere cheese, to taste

Shallot vinaigrette
2 Tbsp olive oil
2 Tbsp sherry or red wine vinegar
1 Tbsp minced shallot
1/2 tsp dijon mustard
1 tsp mayonnaise
1 large pinch of salt

Heat the butter in a large skillet over a medium high flame. When the butter has begun to bubble and brown slightly, add the mushrooms and cook, turning every 1-2 minutes, until well browned on all sides and very floppy, about 6-8 minutes. Remove the mushrooms to a plate and sprinkle with salt.

Add the olive oil to the pan and heat until very hot, but not smoking. Sear half of the radicchio on one side and then flip to the other side and sear again. If the pan is hot enough, this should take about 5-6 minutes. Turn off the heat and sprinkle with salt.

Add the mushrooms back to the pan with the radicchio to warm back up, but don’t turn the flame back on.

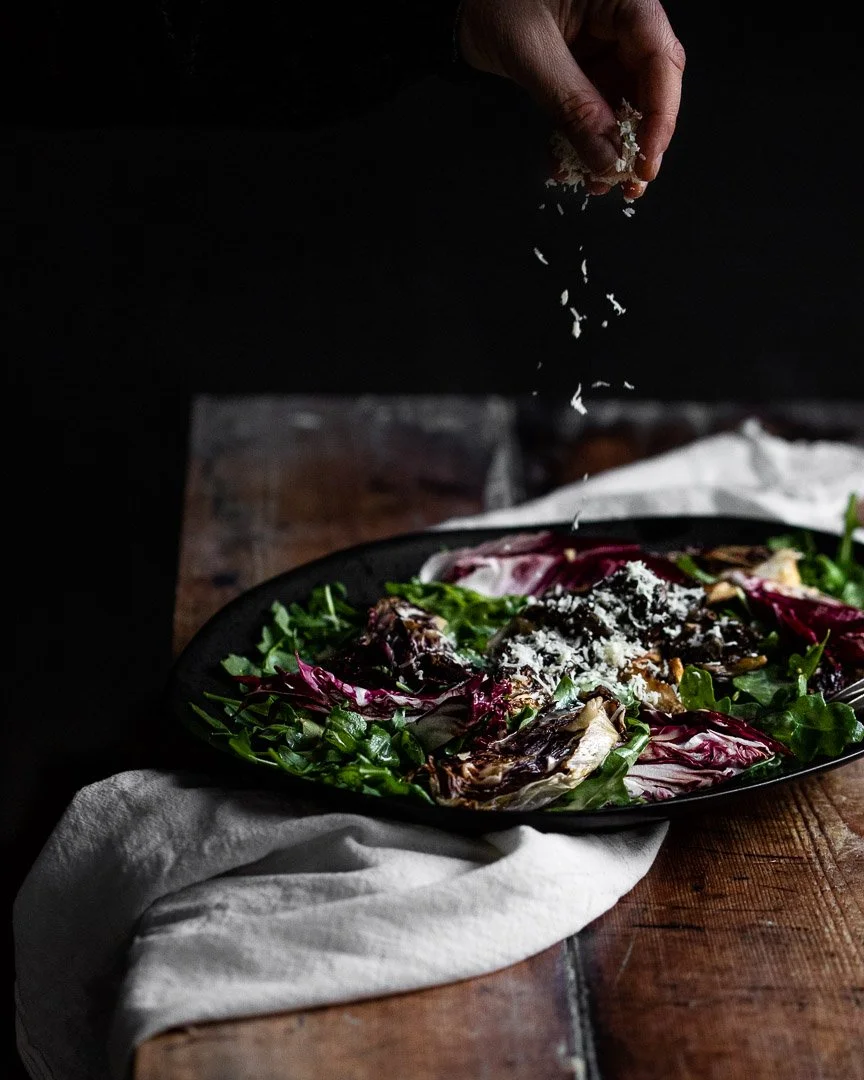
Add the arugula and the raw radicchio to a large plate or bowl. Add half of the dressing and toss well. Sprinkle with sea salt.

Top with the warm mushrooms and radicchio. Pour on more dressing to taste.

Add large flakes of the nutty, salty cheese on top to taste. Serve immediately.

Miso parmesan chickpeas and kale

This quick dish is funky, salty, cheesy, and creamy with lots of greens and filling fiber thanks to the beans. #meandthemoose #lunch #dinner #sidedishes #kalerecipes #chickpearecipes #vegetarianrecipes

This quick dish is funky, salty, cheesy, and creamy with lots of greens and filling fiber thanks to the beans. #meandthemoose #lunch #dinner #sidedishes #kalerecipes #chickpearecipes #vegetarianrecipes

This quick side dish or light main is an easy way to add some greens to your meal that are both tasty and satisfying.

Take me to the greens!

This quick dish is funky, salty, cheesy, and creamy with lots of greens and filling fiber thanks to the beans. #meandthemoose #lunch #dinner #sidedishes #kalerecipes #chickpearecipes #vegetarianrecipesall the difference.

This quick dish is funky, salty, cheesy, and creamy with lots of greens and filling fiber thanks to the beans. #meandthemoose #lunch #dinner #sidedishes #kalerecipes #chickpearecipes #vegetarianrecipesall the difference.

The idea for these greens came from a New York Times Cooking recipe for Miso pasta. That simple recipe combines only butter, miso, and parmesan cheese with pasta, pasta water, and a little nori on top. My husband made this dish on a whim and we were all sort of stunned by its deliciousness— even the 6-year-old!

I mean, what’s not to love?? It’s funky, salty, cheesy, a little creamy, and a lot carby. I replaced the pasta with beans and greens, which is just a light nod to health, but if you wanted to add the pasta back in (or garbanzo pasta to double up on the bean-age!) that would also be delicious.

We typically eat this as a side dish with a simple chicken or fish that’s either grilled or roasted while the kale cooks.

This quick dish is funky, salty, cheesy, and creamy with lots of greens and filling fiber thanks to the beans. #meandthemoose #lunch #dinner #sidedishes #kalerecipes #chickpearecipes #vegetarianrecipes

This quick dish is funky, salty, cheesy, and creamy with lots of greens and filling fiber thanks to the beans. #meandthemoose #lunch #dinner #sidedishes #kalerecipes #chickpearecipes #vegetarianrecipes

Just a quick note about this recipe: I used salted butter because I like things pretty salty. Between the butter, miso, and parmesan, there’s a lot of salt in this dish. While I normally advocate salting as you cook to build layers of flavor, I encourage you to hold off on adding any extra sodium until you’ve finished the dish.

This quick dish is funky, salty, cheesy, and creamy with lots of greens and filling fiber thanks to the beans. #meandthemoose #lunch #dinner #sidedishes #kalerecipes #chickpearecipes #vegetarianrecipes

This quick dish is funky, salty, cheesy, and creamy with lots of greens and filling fiber thanks to the beans. #meandthemoose #lunch #dinner #sidedishes #kalerecipes #chickpearecipes #vegetarianrecipes

This quick dish is funky, salty, cheesy, and creamy with lots of greens and filling fiber thanks to the beans. #meandthemoose #lunch #dinner #sidedishes #kalerecipes #chickpearecipes #vegetarianrecipes

This quick dish is funky, salty, cheesy, and creamy with lots of greens and filling fiber thanks to the beans. #meandthemoose #lunch #dinner #sidedishes #kalerecipes #chickpearecipes #vegetarianrecipes

Miso parmesan chickpeas and kale

Time: about 20 minutes, all active 
Yield: 4 side servings, 2 main servings

3 Tbsp butter (I use salted, but use whatever you have)
1 can chickpeas, drained and dried 
1 bunch kale, stems removed and thinly sliced (about 3 firmly packed cups of you’re using prechopped or frozen)
1 heaping Tbsp white miso paste 
3 Tbsp water, plus more as needed
½ cup parmesan cheese, shredded
Squeeze of lemon juice, to taste 
Chili pepper flakes, optional
Fried egg, optional


Over medium high heat, melt your butter. This should only take 1-2 minutes and the butter might start bubbling on the sides, which is fine!

Add the chickpeas and cook, shaking the pan frequently, until the beans and the butter start to brown, about 4-5 minutes. If you don’t drain the chickpeas thoroughly, never fear! Your butter won’t get quite as brown and may need an extra minute or two to brown the chickpeas.

Add the kale and stir to coat. Turn the heat down to medium low and let cook for 1-2 minutes while you prep the miso.

Combine the water and miso paste in a small bowl or measuring cup and whisk to combine. Add to the pan and stir well. If the liquid boils off immediately or if there are brown bits stuck to the bottom of the pan, use 3-4 more Tbsp of water at a time to deglaze the pan. Repeat if necessary. You should have a little bit of liquid in the bottom of the pan before adding the cheese. 

Turn off the heat and add the parmesan. Stir until melted. 

Squeeze the lemon and garnish with chili pepper flakes, more cheese, and an egg if desired.

Cacio e pepe cauliflower and chickpeas

Cacio e pepe cauliflower and chickpeas | Me & The Moose. This vegetarian sheetpan dish hits all the right notes of cheesy, creamy, crunchy, and delicious. It’s filled with protein and appealing to vegetarians and carnivores alike. #meandthemoose…

Take me to the recipe!

So, I have to confess something: I’m not sold on the pretend-cauliflower-is-the-same-as-carbs trend. I’ve had the Trader Joe’s cauliflower gnocchi and it’s good, but it’s not gnocchi. I’ve resisted cauliflower pizza crust because…I just…can’t. I like cauliflower rice, but only with other strong flavors.

Cacio e pepe cauliflower and chickpeas | Me & The Moose. This vegetarian sheetpan dish hits all the right notes of cheesy, creamy, crunchy, and delicious. It’s filled with protein and appealing to vegetarians and carnivores alike. #meandthemoose…

However, I do like cauliflower, especially when it’s covered in cheese, garlic, and breadcrumbs.

Cacio e pepe purists may hate this recipe, but hear me out. The best part of cacio e pepe is the creamy sauce that’s achieved by mixing the starchy pasta water with cheese. But when you roast cauliflower, the stalks and larger pieces actually do get a little creamy.

Cacio e pepe cauliflower and chickpeas | Me & The Moose. This vegetarian sheetpan dish hits all the right notes of cheesy, creamy, crunchy, and delicious. It’s filled with protein and appealing to vegetarians and carnivores alike. #meandthemoose…

And my kiddo likes things with a crunch more than things that are soft and creamy, so throwing in a little panko is a nice textural counterpoint to the softer cheese and veggies.

Add a drained can of chickpeas and you have an actually filling vegetarian meal or a hearty side.

Cacio e pepe cauliflower and chickpeas | Me & The Moose. This vegetarian sheetpan dish hits all the right notes of cheesy, creamy, crunchy, and delicious. It’s filled with protein and appealing to vegetarians and carnivores alike. #meandthemoose…

Cacio e pepe cauliflower and chickpeas

1 large head of cauliflower
1 can chick peas; drained, rinsed, and dried
3 Tbsp olive oil
½ tsp sea salt
5-6 grinds of freshly ground pepper
¾ cup grated Parmesan or Pecorino cheese (3 oz)
2 large cloves garlic
¼ cup panko
½ tsp sea salt
¼ tsp freshly ground pepper
2 Tbsp mayonnaise

Preheat oven to 425.

Drain and dry one can of chickpeas. Set aside.

Remove the leaves from your cauliflower, but leave the central core intact. Chop into 1-inch slices. You’ll probably get between 2 and 4 intact steaks and the rest will fall into florets, which is fine.

Place the cauliflower steaks and chickpeas onto your sheet pan and then fill in with cauliflower florets.

Brush the steaks, florets, and beans with the olive oil. Sprinkle with salt and pepper.

Roast for 15-20 minutes, until the steaks are just fork tender. (You don’t want mushy cauliflower, but this is the majority of the cooking the steaks will do, so use your best judgment about how cooked you like your veggies.)

While the veggies and beans are roasting, pulse the cheese in a food processor until it’s in coarse crumbles (if not using pre-grated). Add the garlic, panko, salt, and pepper and pulse until the garlic is minced and everything is mixed together. Set aside.

Carefully remove the pan from the oven. 

Spread a thin layer of mayo over the steaks and any of the larger florets of cauliflower. Top liberally with the cheese, panko, salt, and pepper mixture. Press lightly into the steaks to get the cheese to stick.

Return to the oven and roast for another 10-12 minutes until the cheese is brown and crunchy. Keep an eye out that the cheese doesn’t burn.

Yield: 4-6 side dishes, 2-3 main dishes

Cacio e pepe cauliflower and chickpeas | Me & The Moose. This vegetarian sheetpan dish hits all the right notes of cheesy, creamy, crunchy, and delicious. It’s filled with protein and appealing to vegetarians and carnivores alike. #meandthemoose…

Creamy tomato and white bean pasta

IMG_8189.jpg

TOMATO SEASON IS HERE!!!!!!! I looooooove tomatoes. Love. And so does M (though he mysteriously won't eat them in his lunchbox anymore).

IMG_8178.jpg

M does not always love beans though. He eats them, but they aren't on the top of his list.

As anyone who's read this blog knows, I have a relationship with healthy eating. Like all relationships, it takes work and there are lots of struggles. But any article titled, "The Last Conversation You'll Ever Need To Have About Eating Right," I am 100% going to read. I mean, I'm not going to stop having conversations about eating right, but I liked the article and one of my main takeaways was: Beans are good. Full stop. So, we're eating more beans, which is sometimes a struggle with a toddler.

These beans are not the healthiest things I've ever eaten. But a little bit of cream and Parmesan go a long way. A boat load of tomatoes, onions, garlic, salt, and fresh thyme also do some heavy lifting to form a dish that is hearty and tasty and takes advantage of the best summer produce.

But the secret ingredient here is patience. Reducing the sauce to a syrupy, caramely sauce gives you maximum tomato flavor.

And then your toddler will eat beans.

IMG_8176.jpg

Creamy tomato and white bean pasta 

1 Tbsp olive oil
½ large white onion, minced
5 large garlic cloves, minced
2 pounds cherry or other heirloom tomatoes (or a mixture of both)
1 can white beans
2 Tbsp heavy cream
½ cup grated parmesan cheese
1 cup pasta, cooked
¼- ½ tsp salt (more to taste)
pepper
Thyme (2 tsp fresh or 1/2 tsp dried, or to taste)

In a medium pot, bring well- salted water to a boil for the pasta. Cook the pasta according to package directions.

While the water is coming to a boil, mince the onions and garlic. Over medium-low heat, saute the onions for 4-5 minutes or until translucent. Add the garlic and cook for one more minute, or until fragrant.

Chop the tomatoes and add them to the onions and garlic. Turn the flame up to medium and cook, stirring occasionally, for 10-12 minutes, or until the tomatoes release their water and begin to boil.

The liquid should be at a consistent and vigorous boil. If it isn’t, turn the heat up slightly until the liquid begins to boil. Continue cooking, stirring occasionally, until the tomato liquid has reduced by more than half and become syrupy, about another 8-10 minutes.

Add the heavy cream and parmesan cheese and stir to combine. Continue simmering for 4-5 more minutes, stirring regularly, until the sauce thickens. (You should be able to scrape the bottom of the pan and the sauce doesn’t ooze back right away.)

Add the beans and pasta to the sauce and stir to combine. Cook for one more minute to heat the beans and the pasta through.

Season with salt and pepper and sprinkle with fresh or dried thyme.

Yield: 4 servings (one heaping cup each)

IMG_8192.jpg

Meatless Monday: Lentil meatballs

IMG_7387.jpg

Well, it's happened. M is officially in preschool. He's officially potty trained. He's officially a kid and not a baby. I'm officially unsure of how I feel. On the one hand, I'm so happy! I'm writing a post without a child hanging on my leg! I'm staring down the gaping maw of 4 whole hours to myself every day!

IMG_7071.jpg

On the other hand, it's the end of a really sweet time in our lives. Being home with M all day every day was exhausting and sometimes unfulfilling, but more often it was pretty magical. I was there every time he learned something new or said something hilarious. We had adventures and figured out our new town together and made some friends. Not that those things are over, but it's definitely going to be different. Different in a good way, I hope. We'll see.

IMG_7083.jpg

You know what else is different in a good way? Meatless meatballs. (See what I did there?) Seriously though, we've been trying to cut out meat once a week, but not skimp on taste and IT. IS. POSSIBLE. These meatballs are delicious.

IMG_7086.jpg
IMG_7110.jpg

They're tender, but don't fall apart. The garlic and onion powder load them with flavor and the Parmesan gives them a toasty crust when lightly sauteed. And a couple of eggs and some panko bind them together without drying them out.

IMG_7385.jpg

A couple of notes:
- You want the lentils to overcook a little, so I cut back on the water and cook them a tiny bit longer than is necessary. The slight mushiness helps to bind the meatball mixture together.

- I've also tried cooking these in a few ways: Roasting keeps the balls very circular, but I miss the slight crunch that comes with sauteeing. And cooking these right in the sauce makes them fall apart a bit. So, sauteeing is the way to go.

IMG_7390.jpg

Lentil meatballs

1.5 cup green or brown lentils (makes 3 cups cooked) 
3.5-4.5 cups water* (see notes below)
Large pinch of salt
¾ tsp onion powder
2-4 large cloves garlic, minced
¾-1 cup panko
1/3 cup finely grated parmesan
2 large eggs
½ tsp sea salt
2 Tbsp of olive oil

Combine water and lentils* (see notes below) and bring to a boil over high heat. Turn heat down to low and simmer, partially covered, for the times noted below. Our goal here is a slightly mushy lentil, which will help the meatballs stick together.

When all the water has evaporated and the lentils are cooked, drain well over a fine mesh sieve while they cool slightly, about 5 minutes.

Combine the lentils and the rest of the ingredients (start with ¾ of the panko and add more later if needed) in a bowl and mix well. The mixture will be sticky and ever-so-slightly slack at this stage, but should be easy to roll into balls. If the mixture feels very slack, sticky, or is hard to form into balls, add the other ¼ cup of panko to the mixture and try again.

Form into balls and chill in the fridge for at 30 minutes.

Heat the olive oil in a pan over medium heat. Turn the heat down to medium low and add the meatballs. Let a crust form on one side. Flip the meatballs over and crust the other side. The process should take about 12-15 minutes.

Yield: 12-20 meatballs (1/4 cup to 1/8 cup)

*If using large brown or green lentils, use 4.5 cups of water for 1.5 cups lentils and cook until water has evaporated entirely, about 30-35 minutes. If using small green or brown lentils, use 3.5 cups of water for 1.5 cups lentils and check after 20-25 minutes. If the lentils have too much bite left, but are dry, add 1/4 cup of water, cover partially, and continue cooking, checking every 3 minutes until water has evaporated or the lentils are mushy enough.

IMG_7125.jpg