Coconut and cardamom alfajores

Alfajores made easier with store-bought dulce de leche and a streamlined recipe and method. Save time AND make delicious cookies this year! #meandthemoose #holidaybaking #Christmascookies #alfajores #shortbreadcookies #dulcedeleche #cookierecipes #b…

You may think you don’t need another holiday cookie recipe, but these are subtly spiced, barely sweet, and super easy. Win, win, win!

Take me to the cookies!

Alfajores made easier with store-bought dulce de leche and a streamlined recipe and method. Save time AND make delicious cookies this year! #meandthemoose #holidaybaking #Christmascookies #alfajores #shortbreadcookies #dulcedeleche #cookierecipes #b…

First of all, who’s had Alfajores before? If not, get thee to an Argentinian bakery because they. are. delicious. This South American staple uses dulce de leche in between two soft, cakey, vanilla cookies and is then rolled in shredded coconut.

In the US version, we often swap the softer cookie for a crispier vanilla shortbread, which I prefer. Also, I decided to skip the shredded coconut on the outside and opt for a coconut-flavored shortbread because, while I love the taste of coconut, I don’t always love its texture.

Alfajores made easier with store-bought dulce de leche and a streamlined recipe and method. Save time AND make delicious cookies this year! #meandthemoose #holidaybaking #Christmascookies #alfajores #shortbreadcookies #dulcedeleche #cookierecipes #b…

I started with this Coconut Shortbread recipe from Food52, but simplified the method, dialed down the sugar, swapped two egg yolks for one whole egg, and added a tiny bit of cardamom for a warmer, spicier flavor that felt right for the holidays.

You know what else feels right for the holidays? Shortcuts. In this version of the recipe, we use only one bowl and mix up cold fats with the rest of the ingredients in a food processor instead of a mixer.

AND, this part might seem like sacrilege to some, but I used jarred dulce de leche. I know, I know. Bad food blogger, bad! I like this one the most and found it at World Market, but you can also find it online. If you feel like making your own, here are some options:

Smitten Kitchen’s stovetop dulce de leche
Displaced Housewife’s olive oil dulce de leche
Live Well Bake Often’s oven-baked dulce de leche
The Spruce Eats boiled condensed milk dulce de leche

Here we go!

Alfajores made easier with store-bought dulce de leche and a streamlined recipe and method. Save time AND make delicious cookies this year! #meandthemoose #holidaybaking #Christmascookies #alfajores #shortbreadcookies #dulcedeleche #cookierecipes #b…

Coconut and cardamom alfajores

Yield: 24 cutout cookies; 12 sandwiches
Time: 90 minutes (about 30 active)

½ cup (1 stick) butter, cut into ½ inch cubes
6 Tbsp coconut oil (solid)
½ cup cane sugar (can substitute granulated sugar if necessary)
1 tsp vanilla extract
1 egg
2 cups all-purpose flour
¼ cup coconut flour
1/4 tsp cardamom
¼ tsp sea salt
1 15-oz jar of dulce de leche

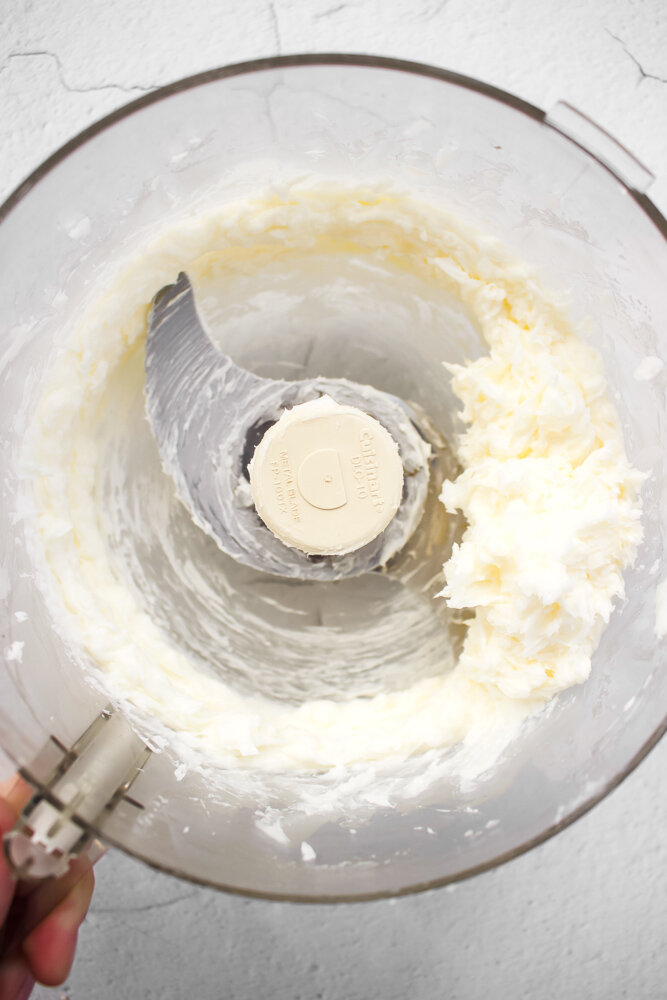
Cube the butter and add it to a food processor. Add the coconut oil (making sure it’s solid). Run the food processor until the butter and coconut oil have combined and are smooth, about 30 seconds. You may have to scrape down the sides.

Add the sugar, vanilla extract, and egg. Run the machine until the ingredients are well combined. Again, you may have to scrape down the sides.

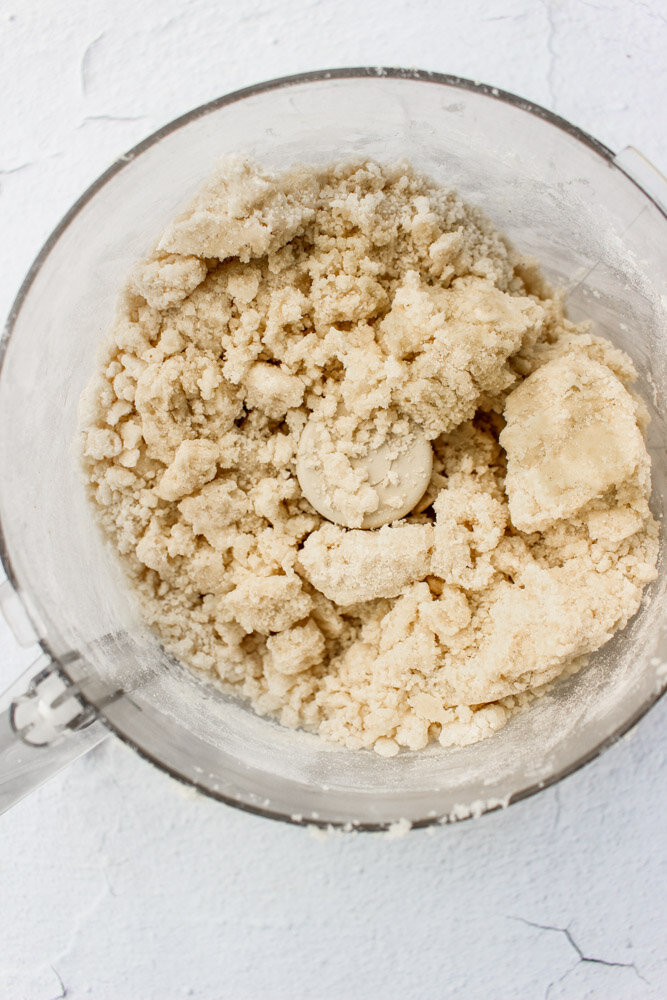
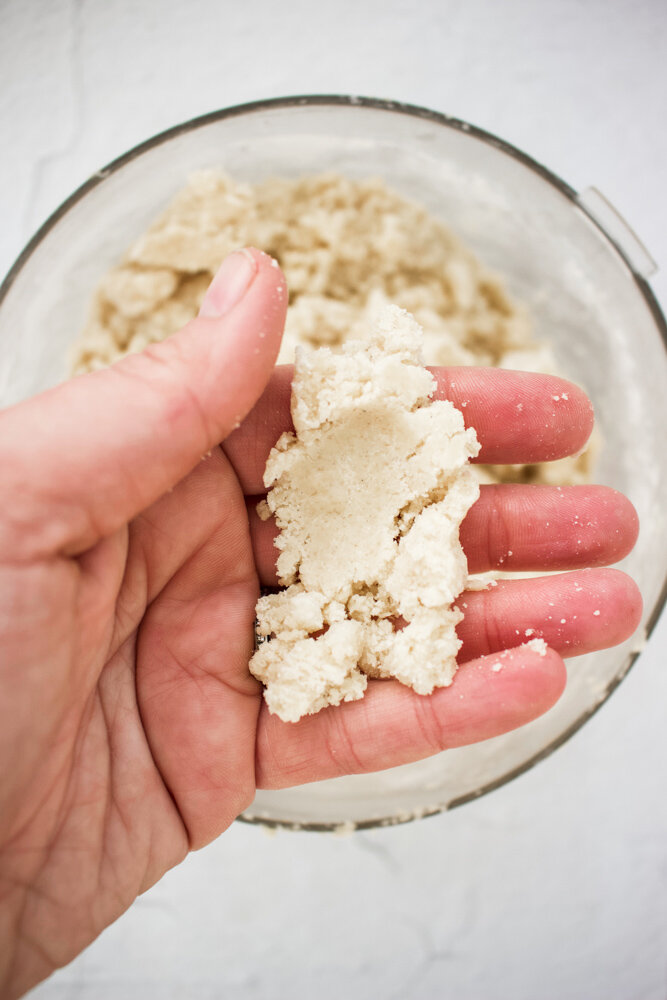
Add the dry ingredients and pulse just until the dough comes together. I often need to scrape the sides once. The end result of the dough should be a crumbly wet dough that’s in large and small sandy chunks that come together easily when pressed.  The dough should be wetter than a pie dough, but slightly more crumbly than your typical sugar cookie dough.

Divide the dough roughly in half and place one dough chunk on a sheet of parchment paper. Using the paper or your hands to form a ball. Place another piece of parchment on top of the dough ball and roll out to a ¼-inch thick disk. Repeat with the other half of the dough. Chill both dough disks in the refrigerator for 30 minutes.

When the dough has chilled for about 25 minutes, preheat the oven to 325.

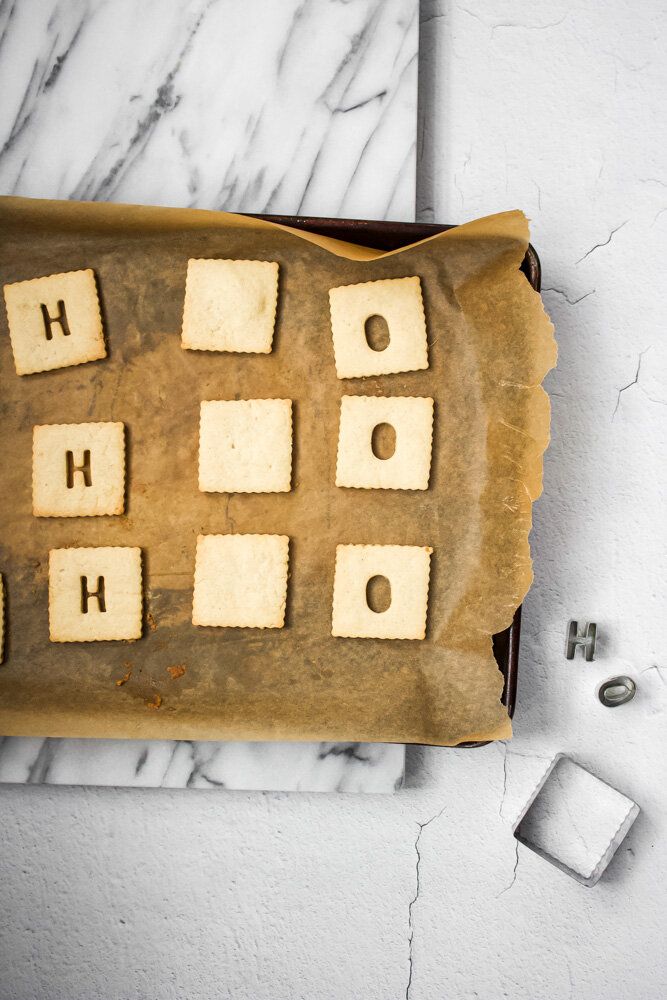
Working one disk at a time, remove the top parchment sheet from each half and use it to line a cookie sheet. Cut out as many shapes as possible and gently transfer them. Re-roll the dough to cut out more shapes. For the cookies that will be the base of each sandwich, score gently with a fork. For the top cookie, cut out any shape you like from the middle.

Bake the cutout cookies for 14-17 minutes, turning once during baking to ensure even cooking. The cookies are done when they just begin to brown. Let cool.  

When the cookies are cool, top each bottom portion with 2-3 Tbsp of dulce de leche and top with a cutout cookie.

Black Bean Soup

Guys, I'm ALONE. Not in the despair-filled, we're-all-ultimately-alone-in-this-life sense, but in the literal, concrete sense. I spent my first night away from M and E last night and it was glorious and bittersweet in equal measure. After a good 45 minutes of looking at pictures of M on my phone and missing him ferociously, I spun around The-Hills-Are-Alive style in my room before falling asleep in my hotel bathrobe at 10:30.

It's a funny time to be away and probably a good test of my anxiety coping skills. After M's injury last week, I'm feeling more protective of him than ever, so this is forcing me to deal with the lingering fear that SOMETHING WILL HAPPEN. Because something will happen eventually- it always does. Although last week I felt panicked realizing that I can't always protect M, I'm trying to remember that I AM protecting him by giving him life skills and resilience and by not hovering and sending him the message that I don't trust him and that the world is filled with danger. Also, his dad is the greatest, so I really need to chill out. 

Anyhoo, this is my first post in some time that wasn't interrupted by a small person with constant demands OR exhaustion from addressing said small person's constant demands. So without further ado: Delicious black bean soup!

A few notes: 15 minutes is a long time for onions to start a soup, but the caramelizing really enhances the flavor of this simple dish. Also, this soup is of a medium thickness. If one wanted a thicker soup, reduce the liquid by 1 cup. Similarly, to thin the soup further, add 1/2 to 1 cup more liquid. I like the textural difference of some pureed and some whole beans, but one could also puree the whole thing for a uniform consistency. Other ways to add texture: Set side some caramelized onions for later topping; add in a small can of poblanos or other roasted, chopped green chilis; top with crushed tortilla chips, cojita cheese, cilantro, chopped tomatoes, etc for faux nachos on top.

Black bean soup

1 Tbsp olive oil
1 Tbsp butter
1 medium onion, chopped
4 large cloves garlic
1 tsp oregano
½ tsp cumin
1/8-¼ tsp cayenne
2 cans black beans, drained and rinsed
4 cups chicken stock
S/P

Heat olive oil and butter over a medium flame. Add the chopped onion and cook, stirring occasionally, until browned and caramelized, about 15-20 minutes. Add the garlic and spices and cook for 2-3 minutes, or until fragrant.

Add 1.5 cans of black beans and chicken stock and bring to a boil. Reduce heat to low and simmer, covered, for 30 minutes. Let cool slightly, and using an immersion or regular blender, puree the soup. Add the other .5 cans of beans, salt and pepper to taste, and heat through again.

Yield: 50 oz or about 5 cups

Buffalo chicken and cauliflower burgers

Buffalo chicken burger | Me & The Moose. This burger is perfect for lunch or dinner or game day snacks. Throw an egg on top and it could also be breakfast. #meandthemoose #Glutenfree #burgers #easydinner #quickdinner #dinnerrecipes #lunch

Buffalo chicken burger | Me & The Moose. This burger is perfect for lunch or dinner or game day snacks. Throw an egg on top and it could also be breakfast. #meandthemoose #Glutenfree #burgers #easydinner #quickdinner #dinnerrecipes #lunch #lunchrecipes #gamedaysnacks #buffalochickenburger

These burgers have all the familiar flavors of a buffalo wing, but with a little extra nutrition from the cauliflower, ground almonds, and ground chicken.

Take me to the recipe!

Buffalo chicken burger | Me & The Moose. This burger is perfect for lunch or dinner or game day snacks. Throw an egg on top and it could also be breakfast. #meandthemoose #Glutenfree #burgers #easydinner #quickdinner #dinnerrecipes #lunch

Buffalo chicken burger | Me & The Moose. This burger is perfect for lunch or dinner or game day snacks. Throw an egg on top and it could also be breakfast. #meandthemoose #Glutenfree #burgers #easydinner #quickdinner #dinnerrecipes #lunch #lunchrecipes #gamedaysnacks #buffalochickenburger

Frank’s Red Hot and butter do a lot of the heavy lifting, flavor-wise. But these patties are so easy to throw together and taste so good. Using pre-riced cauliflower saves a step. For the rest, you just throw the ingredients together in a bowl, mix with your hands, and sear a couple of burgers in a hot skillet while basting with a mixture of the melted butter and hot sauce.

If you’re worrying that the cauliflower ruins an otherwise good burger, fear not. You can’t actually taste the cauliflower at all.

I also use almond meal or flour (either is fine- use whatever you have) as a binder with an egg, but since these are burgers and not a meatloaf or meatball, the binding is less important. Lots of burgers are simply meat and spices mixed together, so you can leave out the almond meal if you have an allergy or don’t have any.

Buffalo chicken burger | Me & The Moose. This burger is perfect for lunch or dinner or game day snacks. Throw an egg on top and it could also be breakfast. #meandthemoose #Glutenfree #burgers #easydinner #quickdinner #dinnerrecipes #lunch

Buffalo chicken burger | Me & The Moose. This burger is perfect for lunch or dinner or game day snacks. Throw an egg on top and it could also be breakfast. #meandthemoose #Glutenfree #burgers #easydinner #quickdinner #dinnerrecipes #lunch #lunchrecipes #gamedaysnacks #buffalochickenburger

These burgers are also really versatile if you want to make them into sliders or meatballs as a game day snack. You can also make extras and freeze a batch for the future. I like throwing a fried egg on top and calling these breakfast or tossing them into a salad with some crumbled blue cheese for lunch or a light dinner.

Buffalo chicken burger | Me & The Moose. This burger is perfect for lunch or dinner or game day snacks. Throw an egg on top and it could also be breakfast. #meandthemoose #Glutenfree #burgers #easydinner #quickdinner #dinnerrecipes #lunch

Buffalo chicken burger | Me & The Moose. This burger is perfect for lunch or dinner or game day snacks. Throw an egg on top and it could also be breakfast. #meandthemoose #Glutenfree #burgers #easydinner #quickdinner #dinnerrecipes #lunch #lunchrecipes #gamedaysnacks #buffalochickenburger

Buffalo chicken burgers

Time: 30 minutes
Yield: 6 burgers

1 lb ground chicken
1 cup riced cauliflower
½ medium red onion, finely chopped
2 large cloves garlic, minced
½ cup almond meal
1 egg
1/2 tsp kosher salt
1/4 tsp black pepper
1/4 cup plus 1 Tbsp butter
4-6 Tbsp Frank’s hot sauce

Add chicken, cauliflower, onion, garlic, almond meal, and egg to a large bowl and combine using your hands or a spatula. Form into 6 equal patties using a 1/3 cup measure.

In a separate bowl, melt the butter in the microwave. Add the hot sauce and stir to combine. Set aside.

Melt 1 Tbsp butter and heat over a medium low flame. When hot, add chicken patties and turn up the flame to medium.

While the first side is browning, sprinkle some of the butter/hot sauce mixture onto each patty being careful not to touch the raw meat with your brush or spoon. When the first side has a good sear, flip the burgers over and coat the other side with butter/hot sauce.

After 2-3 minutes, check the sear. If brown enough for your liking, turn the flame down to medium-low, cover, and let cook for another 5-6 minutes. When meat thermometer has reached 165, your burgers are done.

15-minute chicken

Ooof. This is the part of Whole 30 in which I just want to take a LOOOOOONG nap. I think my intense holiday cookies-for-breakfast habit is making this first week tougher than any of my other rounds. I haven't wanted to cheat...actually, I totally wanted a slice of pizza yesterday. Nevermind. So, I've wanted to cheat, but haven't because I have the vision of how great I'll feel in a few days dancing in my head.

What helps during these tired, saggy days at the beginning is having a few really fast recipes ready. We also bought a pressure cooker last year, which has been incredible during Whole 30 because we don't even have to "set it and forget it." We can literally forget it and then do it when we panic that there's nothing for dinner. Not that we ever do that.

15-minute chicken | Me & The Moose. This Whole 30-compliant chicken is made with an instant pot or other pressure cooker and is ready sooo fast. It’s full of garlic and tomatoes and is incredibly savory and rich, but is also clean and simple. #m…

This recipe is based on a classic from Gourmet that I found via Smitten Kitchen. We've made the original and it is stupidly easy and GLORIOUS. But it requires a few hours of cooking time and I lack the mental energy for that at the moment. Also, we OD'd on red meat at the end of the year, so we decided to try this with a whole chicken in the pressure cooker. You could definitely make this with bone-in, skin-on chicken thighs, breasts, or a combination of both, but I wouldn't do boneless, skinless anything because the fat from the skin and bones is what gives the sauce its richness. Also, 3-4 lbs of chicken may seem like a lot, but the chicken, like the meat in the original recipe, is slightly more delicious the next day. I do recommend straining the fat after cooking because there's quite a bit of it. Also, don't skimp on the garlic. You may balk at the idea of feeding a head of garlic to a toddler, but leaving the skin means that the cloves get all mellow and buttery without disintegrating in the sauce and making the whole thing taste overwhelmingly garlicky.  

15-minute chicken | Me & The Moose. This Whole 30-compliant chicken is made with an instant pot or other pressure cooker and is ready sooo fast. It’s full of garlic and tomatoes and is incredibly savory and rich, but is also clean and simple. #m…

We served this with some smashed potatoes that we just chopped, placed in a bowl, covered with plastic wrap, and microwaved for 8 minutes until fork tender and then smashed with a few Tbsp of clarified butter and seasoned with salt and pepper.

15-minute chicken | Me & The Moose. This Whole 30-compliant chicken is made with an instant pot or other pressure cooker and is ready sooo fast. It’s full of garlic and tomatoes and is incredibly savory and rich, but is also clean and simple. #m…

We bought our chicken pre-cut at the grocery store, but you could get your butcher to cut a whole chicken for you or do it yourself at home.

15-minute chicken | Me & The Moose. This Whole 30-compliant chicken is made with an instant pot or other pressure cooker and is ready sooo fast. It’s full of garlic and tomatoes and is incredibly savory and rich, but is also clean and simple. #m…

Pressure cooked chicken with garlic and tomatoes

1 whole chicken, cut into 8 pieces, about 4 lbs
1 box/large can of San Marzano crushed tomatoes, about 28 oz
1 head of garlic
S/P

Season the chicken with salt and pepper and place in the pressure cooker, largest pieces on the bottom. Take apart the bulb of garlic and remove only the flaky outer skin that comes off easily, leaving on the layer of skin around each clove. Add the garlic to the pressure cooker and space out the cloves to avoid any clumps of garlic. Pour the tomatoes over the chicken and garlic and close the pressure cooker. Set to high pressure and poultry, or 15 minutes. Cook. Let the pressure release on its own once cooking is over.

To crisp the chicken skin slightly, place under the broiler for 2-3 minutes or until you’ve reached your desired crispness. The skin won’t get CRISPY since the chicken is already cooked, but it will firm up a bit. If you plan to remove the skin, skip this step and eat immediately. 

Yield: 2 hearty meals for a family of 2 adults and a toddler, plus extra sauce to strain and use in other recipes, if desired.

15-minute chicken | Me & The Moose. This Whole 30-compliant chicken is made with an instant pot or other pressure cooker and is ready sooo fast. It’s full of garlic and tomatoes and is incredibly savory and rich, but is also clean and simple. #m…

Kale pesto

This easy kale pesto is dairy free and packs some extra veggies into any dish you like. #meandthemoose #kalepesto #pestorecipe #dairyfree #dairyfreerecipes

This easy kale pesto is dairy free and packs some extra veggies into any dish you like. #meandthemoose #kalepesto #pestorecipe #dairyfree #dairyfreerecipes

This easy pesto packs lots of veggies into a versatile green sauce that can jazz up any meal.

Take me to the pesto!

This easy kale pesto is dairy free and packs some extra veggies into any dish you like. #meandthemoose #kalepesto #pestorecipe #dairyfree #dairyfreerecipes

This easy kale pesto is dairy free and packs some extra veggies into any dish you like. #meandthemoose #kalepesto #pestorecipe #dairyfree #dairyfreerecipes

I love playing the game “Will it pesto?” It’s similar to two of my other favorite games, “Does it pizza?” and “Will it waffle?” I can safely say that kale is one of my favorite contestants in this game. I skipped the dairy in this recipe, but as always, feel free to go with your gut and add in 1/2 cup of grated Parmesan or other nutty, dry cheese.

This easy kale pesto is dairy free and packs some extra veggies into any dish you like. #meandthemoose #kalepesto #pestorecipe #dairyfree #dairyfreerecipes

This easy kale pesto is dairy free and packs some extra veggies into any dish you like. #meandthemoose #kalepesto #pestorecipe #dairyfree #dairyfreerecipes

This easy kale pesto is dairy free and packs some extra veggies into any dish you like. #meandthemoose #kalepesto #pestorecipe #dairyfree #dairyfreerecipes

This easy kale pesto is dairy free and packs some extra veggies into any dish you like. #meandthemoose #kalepesto #pestorecipe #dairyfree #dairyfreerecipes

Kale pesto

Time: 15 minutes, all active
Yield: About 1 1/2 cups

Adapted from The Kitchn
4 cups chopped kale, firmly packed
1/2 cup toasted walnuts
1/4 cup fresh basil, loosely packed
2 large garlic cloves
1 Tbsp lemon juice
1 tsp salt, plus more to taste
1/2 cup olive oil

Bring a medium pot of water to a boil and fill another large bowl about half way with ice water. Wash and chop kale, but don’t worry about removing the tough stems because everything will be blended anyway. When water is at a rolling boil, add the kale and swirl with a slotted spoon a few times. When kale is a bit wilted (about 1-2 minutes), remove it from the boiling water and immediately add it to the bowl of ice water.

Drain the kale. I don’t drain it very thoroughly (I just take it out of the water and shake it a few times) because I think a little extra water helps to thin the sauce without adding more oil, but you can pat the kale dry if you want a thicker pesto. Add to your blender or food processor.

Roast the walnuts in a 350 oven or toaster oven for about 5 minutes or until just lightly browned and starting to smell nutty. You can also toast them in a sauté pan on the stove top. When browned, add them to the blender or food processor as well.

Add the basil, garlic, salt, and lemon juice and start to blend, slowly adding the olive oil in a thin stream. If using a small food processor or a blender without a top that opens, just add the oil with the rest of the ingredients and process together. Blend until you've reached your desired consistency.