Pickled veggie pasta salad

This pasta salad requires a tiny bit of forethought so that you can let the veggies pickle for a few hours, but it’s well worth the effort for a crowd-pleasing, tangy and bright salad that complements any other BBQ dishes. #meandthemoose #pastasalad…

This pasta salad requires a tiny bit of forethought so that you can let the veggies pickle for a few hours, but it’s well worth the effort for a crowd-pleasing, tangy and bright salad that complements any other BBQ dishes. #meandthemoose #pastasalad #pastarecipes #summerbbq #pickles #pickledveggies

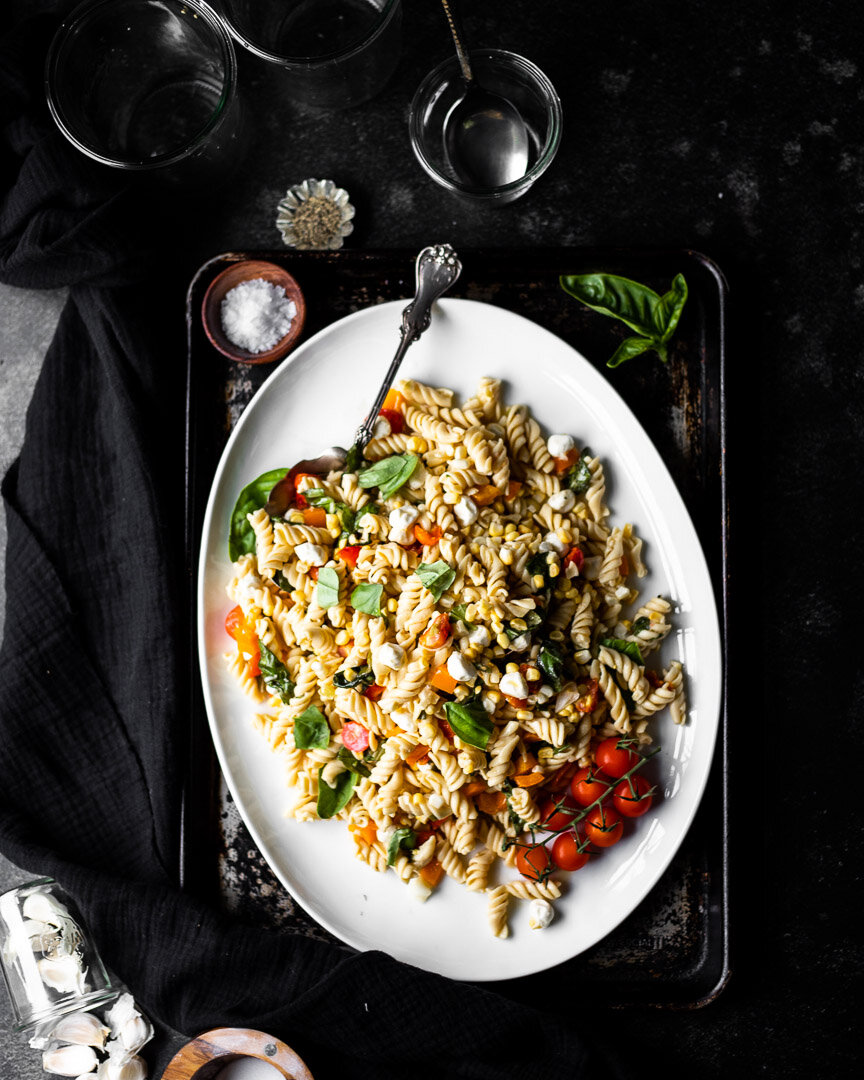
This is my platonic ideal of pasta salad: Tangy, bright, and crunchy, but also a little creamy and, frankly, oily. You can’t help but smell a smoky grill, hear kids laughing, and feel the sun in your face with this salad on your plate.

Just the pasta, please.

This pasta salad requires a tiny bit of forethought so that you can let the veggies pickle for a few hours, but it’s well worth the effort for a crowd-pleasing, tangy and bright salad that complements any other BBQ dishes. #meandthemoose #pastasalad…

This pasta salad requires a tiny bit of forethought so that you can let the veggies pickle for a few hours, but it’s well worth the effort for a crowd-pleasing, tangy and bright salad that complements any other BBQ dishes. #meandthemoose #pastasalad #pastarecipes #summerbbq #pickles #pickledveggies

So, pasta salad is often an underwhelming affair. It feels necessary at BBQs and is easy to produce in huge quantities. And sans eggs or mayo, it keeps in the sun for hours without risking a side of salmonella. But what a waste when it’s totally boring!

This recipe uses a huge quantity of quick-pickled seasonal vegetables and aromatics, which takes a little pre-planning, but is very worth it. My kid also happens to love pickles, which is a pretty good way to get him to eat veggies. And when you do the pickling, you control the salt, sugar, and other junk that enters the mix.

This pasta salad requires a tiny bit of forethought so that you can let the veggies pickle for a few hours, but it’s well worth the effort for a crowd-pleasing, tangy and bright salad that complements any other BBQ dishes. #meandthemoose #pastasalad…

This pasta salad requires a tiny bit of forethought so that you can let the veggies pickle for a few hours, but it’s well worth the effort for a crowd-pleasing, tangy and bright salad that complements any other BBQ dishes. #meandthemoose #pastasalad #pastarecipes #summerbbq #pickles #pickledveggies

The recipe I’ve developed here is best when left overnight, but the veggies can be eaten after about 3 hours and definitely taste pickled. Leaving them overnight helps the garlic to mellow, which can be considered a kindness to your guests, no? But also feel free to omit the garlic if you must.

And while I haven’t included anything but the pasta, dressing, and veggies in this recipe, you can customize this dish in whatever way suits your family. I make this for the three of us with mozzarella balls or feta. I’ve also thought about searing some salmon and flaking it in there or just opening a can of tuna and dumping that in. Also, the pickled veggies remind me of gardiniera, so I’m sure a salami or other Italian cured meat would be amazing in there. Experiment! Go crazy!

This pasta salad requires a tiny bit of forethought so that you can let the veggies pickle for a few hours, but it’s well worth the effort for a crowd-pleasing, tangy and bright salad that complements any other BBQ dishes. #meandthemoose #pastasalad…

This pasta salad requires a tiny bit of forethought so that you can let the veggies pickle for a few hours, but it’s well worth the effort for a crowd-pleasing, tangy and bright salad that complements any other BBQ dishes. #meandthemoose #pastasalad #pastarecipes #summerbbq #pickles #pickledveggies

A couple of notes:

  • I’ve made this salad by putting all of the veggies into one jar and I’ve made them by separating the different veggies into their own jars. If you do the veggies separately, you might need to increase the amount of pickling liquid. Just double or triple the amount of vinegar, sugar, and salt that you mix together and spread it among the different containers.

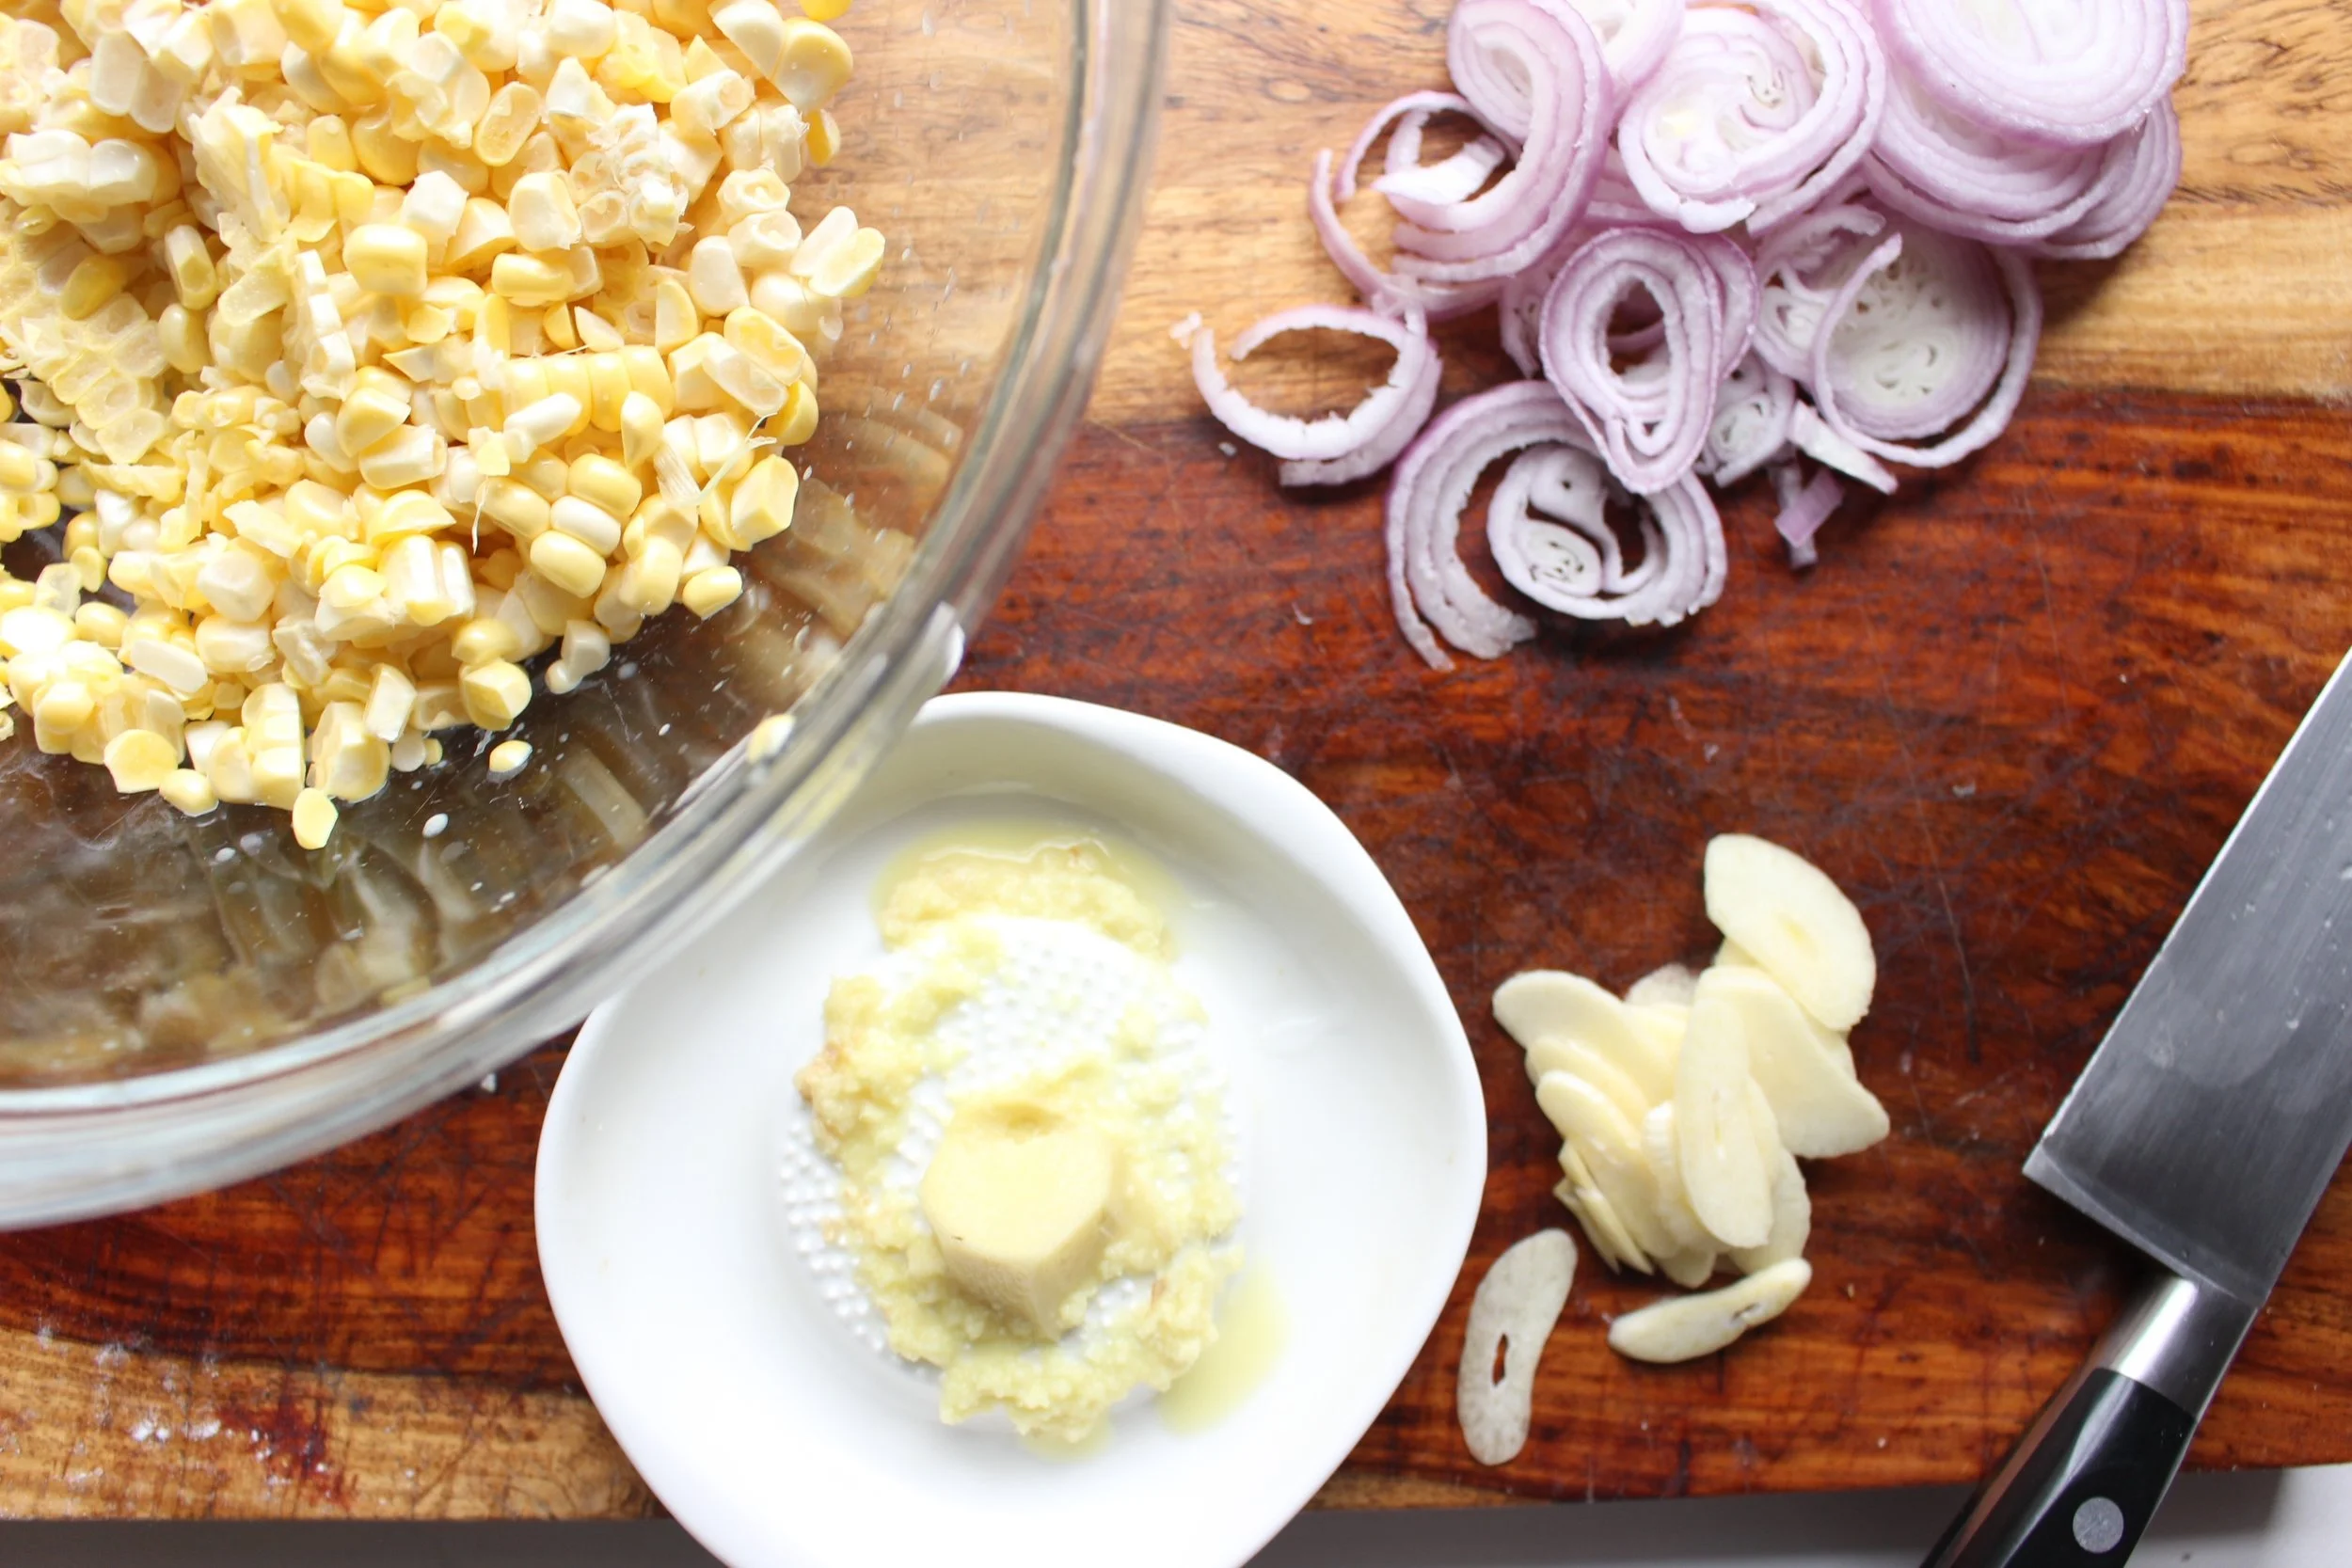
  • I opted for scallions because, though I LOVE a pickled red onion, they turn the pickling liquid (and everything else that’s being soaked) a bit pink.

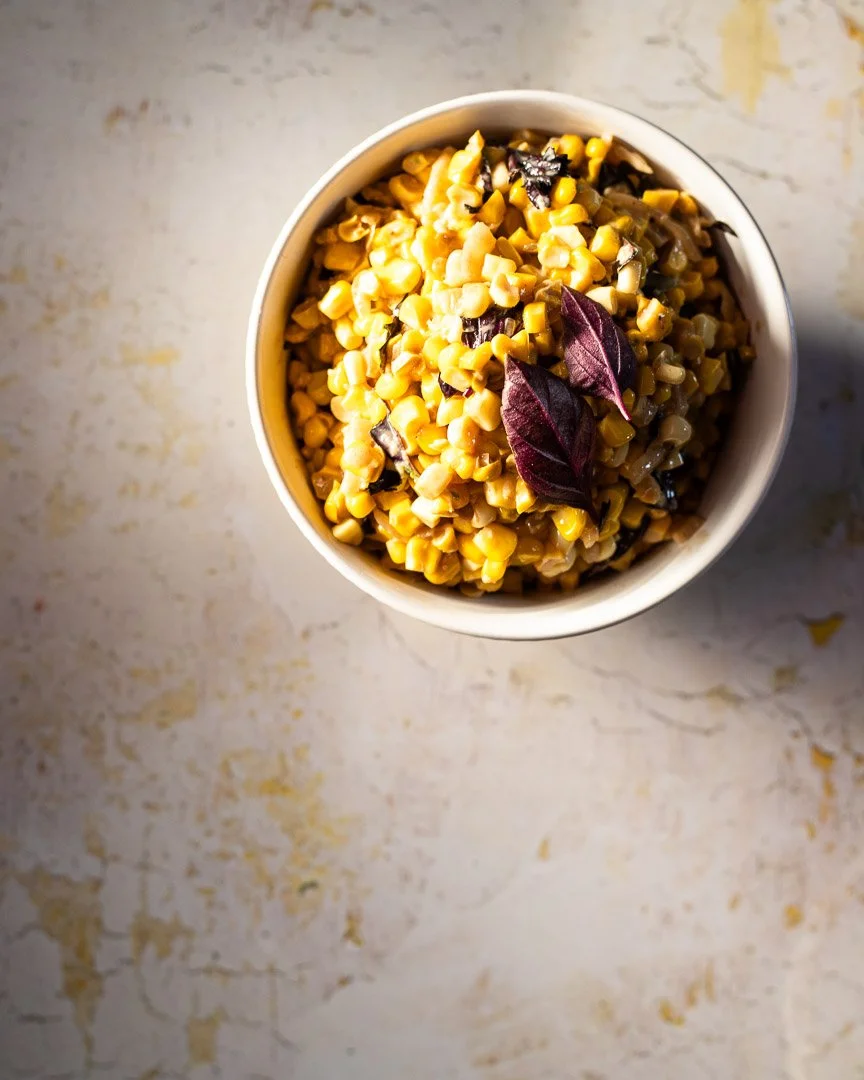
  • I also used fresh corn because it’s in season and is so sweet and perfect right off of the cob that I can’t imagine not using it. But I’m sure frozen would do the trick too.

  • I give a range of oil and a range of pasta to use here. Some fancier pasta comes in smaller amounts (12-14 oz is a popular weight), but you can definitely use a whole pound of that’s the amount you have. Obviously, the more pasta you use, the less prominent the veggies will be and the more sauce you’ll need and vice versa.

  • I’ve also made this with chickpea pasta and, dare I say it, I might PREFER the bean pasta to regular white pasta. Shocking, I know.

This pasta salad requires a tiny bit of forethought so that you can let the veggies pickle for a few hours, but it’s well worth the effort for a crowd-pleasing, tangy and bright salad that complements any other BBQ dishes. #meandthemoose #pastasalad…

This pasta salad requires a tiny bit of forethought so that you can let the veggies pickle for a few hours, but it’s well worth the effort for a crowd-pleasing, tangy and bright salad that complements any other BBQ dishes. #meandthemoose #pastasalad #pastarecipes #summerbbq #pickles #pickledveggies

Pickled veggie pasta salad

Active time: About 30 minutes, mostly spent chopping and mixing
Total time: Anywhere from 3 hours to 1 week, depending on how much you let the pickles sit
Yield: About 9-10 cups of salad

¾ cup white vinegar
1½ Tbsp sugar
¾ tsp salt
3 large cloves garlic, peeled and smashed
½ large bunch scallions (about 4-5 large), trimmed and roughly chopped
1 pint cherry tomatoes, halved  
½ large orange bell pepper, roughly chopped
2-3 large ears corn, with kernels removed (or about 1½-2 cups)
12-16 oz dried pasta (depending on the ratio of vegetables to pasta that you prefer)
1/2- 3/4 cup olive oil
2 Tbsp red wine vinegar
½ tsp Dijon mustard
½ tsp kosher salt
¼ tsp fresh pepper
½ tsp dried or 1 tsp fresh oregano, well minced if using fresh
¼- ½ cup fresh basil leaves, torn

For the pickled vegetables:
In a small bowl, combine the vinegar, sugar, and salt and stir until the sugar has dissolved, about 2 minutes. (You won’t hear any more crunching on the bottom of the container.)

In a large container or several smaller containers with a tight fitting lid (see note above about the amount of pickling liquid if making the pickles in separate jars), add the smashed garlic, chopped scallions, and chopped vegetables. Pour in the vinegar mixture, seal the container, and shake a few times.

Place in the refrigerator and leave for 3 hours or up to 1 week.

For the salad:
Cook your pasta according to package directions in well-salted water.

While your pasta cooks, combine the oil, red wine vinegar, dijon mustard, salt, pepper, and oregano in a small container.

Once the pasta is cooked, drain it and add it to a very large bowl. Add half of the olive oil mixture and stir well.

With a large fork or slotted spoon, remove the vegetables from the pickling liquid, transferring as little of the brine as possible (though don’t go crazy). Set aside the garlic cloves and mince the pickled cloves. Add everything to the pasta and stir well.

Add more of the olive oil mixture to taste until you feel that the pasta salad is wet enough.

Mix in and top with the torn basil before serving.

Sesame roasted brussels sprouts

Sesame roasted brussels sprouts | Me & The Moose. These Brussels sprouts are crunchy, garlicky, sweet, and salty. Basically, the perfect side dish. #brusselssprouts #roasting #sidedish #kidseatvegetables

OMG Halloween hangover. The ten pounds of candy I ate between opening the bags at 11 am (why? WHY?) and going to bed at 9 pm (which felt like midnight), have done a number on my body. I guess it’s a good sign that I feel like shit? Maybe it shows that I don’t normally eat 10,000 grams of sugar in 10 hours?

Anyhoo, we started the day with a small fit because I wouldn’t let someone eat candy for breakfast, so…that was fun.

Sesame roasted brussels sprouts | Me & The Moose. These Brussels sprouts are crunchy, garlicky, sweet, and salty. Basically, the perfect side dish. #brusselssprouts #roasting #sidedish #kidseatvegetables
Sesame roasted brussels sprouts | Me & The Moose. These Brussels sprouts are crunchy, garlicky, sweet, and salty and a great way to get your kids to eat veggies. #brusselssprouts #roasting #sidedish #kidseatvegetables

One key to weaning my little back to veggies after a sugar binge is to make them extra unctuous and delicious. These brussels fit the bill. High heat makes them mellow and crispy while the garlic, ginger, soy sauce, and sesame oil add layers of salt and fat that lead to really big flavor.

Sesame roasted brussels sprouts | Me & The Moose. These Brussels sprouts are crunchy, garlicky, sweet, and salty and a great way to get your kids to eat veggies. #brusselssprouts #roasting #sidedish #kidseatvegetables

A couple of notes:

  • It’s important to work fast after getting the roasted sprouts out of the oven. Their heat will cook the garlic a bit and without it, the taste can be pretty strong.

  • If you think you’ll have leftovers, sprinkle the sesame seeds on the individual portions, or just the part you’ll eat right away. The seeds can burn when you recrisp the leftovers.

Serve them with a piece of fish, some tofu, some rotisserie chicken, or accompanying any other protein. I also like them next to these noodles for a double dose of veggies. You could actually slap some chicken thighs on another sheet pan and roast them all together if your oven is big enough.

Sesame roasted brussels sprouts | Me & The Moose. These Brussels sprouts are crunchy, garlicky, sweet, and salty and a great way to get your kids to eat veggies. #brusselssprouts #roasting #sidedish #kidseatvegetables

Sesame roasted Brussels sprouts  

1 ¼ lb brussels sprouts, halved (or two 10 oz bags)
2 Tbsp olive oil
1 tsp grated fresh ginger (about a 1-inch piece)
2 Tbsp soy sauce or tamari, divided
1 small garlic clove, minced 
1 Tbsp toasted sesame oil
1½- 2 Tbsp honey
1 Tbsp toasted sesame seeds


Preheat the oven to 425.

In a large bowl, combine the veggies, olive oil, 1 Tbsp of soy sauce, and the grated ginger. Mix well. If you see any clumps of ginger, separate them the best you can.

Spread onto a baking sheet and roast for 15-17 minutes (or until you’ve reached peak crispyness, since oven temps vary), stirring once in the middle of cooking.

While the veggies are roasting, mince your garlic and combine it with the remaining 1 Tbsp of soy sauce, sesame oil, and honey.

When the sprouts are roasted, quickly spoon them back into your original bowl. Add the garlic mixture and stir well. Serve immediately.

If reheating this, place the servings you’ll need back into a 425 oven for about 5 minutes (or as long as needed) to re-crisp.

Yield: about 3 cups of sprouts, or 4 servings.

Sesame roasted brussels sprouts | Me & The Moose. These Brussels sprouts are crunchy, garlicky, sweet, and salty and a great way to get your kids to eat veggies. #brusselssprouts #roasting #sidedish #kidseatvegetables

Coconut creamed corn

Creamed corn isn’t generally considered a “healthy” side. But swap in coconut milk for regular old dairy or a heavy bechamel sauce and you have a much lighter version of this classic that celebrates the beauty of late summer corn.

IMG_8536.jpg

This dish also comes together in minutes and is full of herbs and aromatics like garlic, shallot, ginger, lime zest, and basil. Add some quick sauteed shrimp, some grilled or roasted white fish, or a rotisserie chicken and you have a very quick dinner filled with healthy fats and real ingredients. You’re also free of gluten, dairy, sugar, nuts, and soy if you have corn leftovers for tomorrow’s lunchbox.

IMG_8533.jpg

Coconut creamed corn

½ tsp coconut oil
2 medium or 3 small garlic cloves, sliced or minced  
1 very large or 2 smaller shallots, sliced or minced
½-inch piece of fresh ginger, minced or shredded
3 large ears corn with kernels removed from the cob (about 2 heaping cups of kernels)
6 Tbsp coconut milk
Heaping ¼ tsp lime zest
15-20 basil leaves, chopped
¼-½ tsp flaky sea salt
Pepper

Heat the coconut oil over a medium flame and when hot, add the sliced or minced shallots. Saute for 1-2 minutes, until the shallots are translucent and starting to brown.

Turn the heat down to medium low and add the sliced or minced garlic. Saute for another 1-2 minutes until fragrant. If the onions or garlic brown too quickly, turn down the heat.

Add the minced or shredded ginger and sauté for one more minute.

Add the corn kernels and sauté for 4-5 minutes. Add the coconut milk and let bubble for one minute until the milk has reduced to more of a sauce than a milk, but don’t let it disappear.

Remove from the heat. Add the lime zest, minced basil, salt, and pepper and stir to combine. Taste for seasoning and adjust according to your taste.

Yield: 3 servings

IMG_8542.jpg

Clam pizza

Clam Pizza | Me & The Moose Whether you use store-bough crust or make your own, cook it on a grill, in the oven, or in a pizza oven, this is my take on the clam pizza full of garlic, cheese, and briny clams. #meandthemoose #pizza #clampizza #homemadepizza

You need a pizza stone, a pizza peel, some ingredients, and the grill or your oven to make the briniest, garlickiest, cheesiest, and most unctuous clam pizza at home.

Take me to the pizza!

Clam Pizza | Me & The Moose Whether you use store-bough crust or make your own, cook it on a grill, in the oven, or in a pizza oven, this is my take on the clam pizza full of garlic, cheese, and briny clams. #meandthemoose #pizza #clampizza #homemadepizza

Clam pizza is such a Connecticut thing. I'm sure some would argue that it's also a New York thing, but I feel like Frank Pepe, the New Haven pizza institution, is best known for it's clam pizza, and thus, clam pizza is a Connecticut thing. That's my story and I'm sticking to it.

I first tried this briny, garlicky pie on a trip to Connecticut long before moving here myself. And I've been on a Goldilocksian journey to find the best one ever since. They have either been too salty, not garlicky enough, or without cheese, which is unacceptable to me when it comes to pizza. (Don't yell at me, people who think seafood and cheese should never mingle.)

Clam Pizza | Me & The Moose Whether you use store-bough crust or make your own, cook it on a grill, in the oven, or in a pizza oven, this is my take on the clam pizza full of garlic, cheese, and briny clams. #meandthemoose #pizza #clampizza #homemadepizza

We have not yet found our favorite (sorry, Pepe's), but instead have been making our favorite. Full of three different kinds of cheese and two different kinds of garlic, this pizza tastes like clams and tastes like a proper pizza, but also SO MUCH MORE. 

I cook this pie using a hot pizza stone on the grill because a) not everyone has a grill, so you can easily recreate this in an oven with the pizza stone (see directions in the recipe); and b) because I've never grilled my pizza directly on the grill grates. If you're braver than I am, here are some instructions for that method.

We’ve also recently started using our Ooni pizza oven (not an ad, we just love it!) to cook this CT classic and the smokiness of the wood-fired oven takes the flavors to another level.

A couple of notes:

  • This is a heavy pizza before it’s cooked. What I mean is, the toppings really weight down the raw pizza dough. So make sure you use LOTS of flour under the crust to ensure that it comes off of your pizza peel and onto the pizza stone intact.

  • If you aren't as into garlic (this recipe calls for 10 cloves), either reduce the number of fresh cloves or just use the roasted ones. Their flavor is much mellower and blends well with the cheese.

  • Please do garnish with the lemon and sea salt. They make a huge difference in the final product.

Clam Pizza | Me & The Moose Whether you use store-bough crust or make your own, cook it on a grill, in the oven, or in a pizza oven, this is my take on the clam pizza full of garlic, cheese, and briny clams. #meandthemoose #pizza #clampizza #homemadepizza

Clam pizza

Time: 45 minutes
Yield: 1 large or 2 medium pizzas, depending on the size of your crusts

1 pizza dough
Flour to prevent sticking when rolling out dough
1 cup ricotta cheese
7 roasted garlic cloves (see method below)
3 large raw garlic cloves, minced
2 cans clams, drained (about 4 oz of clam meat)
1/2- 3/4 cup nutty cheese such as gruyere, sharp cheddar, gouda (not smoked), or fontina,
shredded
1 cup fresh mozzarella, torn into pieces
Parsley
Lemon wedges
Sea salt
Crushed red pepper flakes

For the roasted garlic:
Preheat the oven or toaster oven to 400. Smash 10 cloves of garlic, but don't remove the peels (if some fall off, great, but no need to do extra work). Add them to a small oven proof container like a ramekin or a coffee mug. Cover with olive oil. Cook until the garlic is bubbling and fragrant and the cloves are very soft when (carefully! hot oil!) squished with a spoon, about 5-8 minutes.

For the pizza:
Preheat your grill on high or your oven at 500. Remove the top rack of your grill or the second rack of your oven and move the remaining rack to the lower middle portion of the oven. (You want enough room above the rack to negotiate your dough onto the pizza stone, but be close enough to the top of the oven to easily brown your cheese. Add the pizza stone and let heat for 30 minutes.

Meanwhile, prep all of your toppings. Set aside. 

On a floured counter or pizza board, roll out or press out your dough until very thin. Lift up half of the dough and scatter more flour underneath. Repeat on the other side. Jiggle your dough to make sure that it’ll slide onto a pizza peel or into the oven easily.

If cooking in the oven, add your toppings before placing the raw dough on the hot pizza stone. If the toppings are weighing down the dough too much, carefully add more flour under the crust.

Carefully slide the topped, raw dough onto the pizza stone in the oven. Cook for 6-8 minutes without opening the oven. Check the pizza and cook for another 2-3 minutes, until the cheese and the sides of the crust begin to brown. Check the bottom crust for doneness (it should be golden brown and crispy).

Remove from the heat and top with chopped parsley, sea salt, lemon, and crushed red pepper flakes (optional).

If cooking on the grill, make sure all of your toppings are measured and easily accessible. Slide the plain, raw dough onto your grill and quickly top with the ricotta, roasted and fresh garlic, the clams, and the shredded cheeses. Close the lid to the grill and let cook for 5 minutes. Check for doneness continue cooking for 2-3 minutes until the crust and cheese begin to brown.

Check the bottom crust for doneness (it should be golden brown and crispy).

Remove from the heat and top with chopped parsley, sea salt, lemon, and crushed red pepper flakes (optional).

One note about grilling: the number of burners on your grill will change the speed at which this pizza cooks. A 6-burner grill might take less than 5 minutes, so check it sooner. A 3-burner grill might take a minute more. Use your judgement based on your grill or oven.

Chicken meatball and cauliflower rice banh mi inspired bowl

Cauliflower rice and chicken meatballs are extra flavorful with tons of aromatics and high heat cooking for a quick, easy meal that can be customized any way you like. #meandthemoose #cauliflowerrice #chickenmeatballs #dinner #banhmirecipes

Cauliflower rice and chicken meatballs are extra flavorful with tons of aromatics and high heat cooking for a quick, easy meal that can be customized any way you like. #meandthemoose #cauliflowerrice #chickenmeatballs #dinner #banhmirecipes

Though this recipe is for a banh mi inspired bowl, the chicken meatballs and the cauliflower rice have a neutral (though uber flavorful!) profile, so they can be customized any way you please.

Take me to the recipe!

Cauliflower rice and chicken meatballs are extra flavorful with tons of aromatics and high heat cooking for a quick, easy meal that can be customized any way you like. #meandthemoose #cauliflowerrice #chickenmeatballs #dinner #banhmirecipes

Cauliflower rice and chicken meatballs are extra flavorful with tons of aromatics and high heat cooking for a quick, easy meal that can be customized any way you like. #meandthemoose #cauliflowerrice #chickenmeatballs #dinner #banhmirecipes

But first, banh mi. It's technically a Vietnamese sandwich with pickled carrots and daikon radishes, cucumbers, cilantro, a spicy mayonnaise, some sort of pate or liverwurst, and another cooked meat. Availability of great Banh mi is the one thing I miss about living in Brooklyn where we used to order these sandwiches at least once a week. That's also possibly why I gained a lot of weight when we lived there.

Now when a craving strikes, I like to incorporate banh mi flavors in a cauliflower rice bowl. 

Cauliflower rice and chicken meatballs are extra flavorful with tons of aromatics and high heat cooking for a quick, easy meal that can be customized any way you like. #meandthemoose #cauliflowerrice #chickenmeatballs #dinner #banhmirecipes

Cauliflower rice and chicken meatballs are extra flavorful with tons of aromatics and high heat cooking for a quick, easy meal that can be customized any way you like. #meandthemoose #cauliflowerrice #chickenmeatballs #dinner #banhmirecipes

I have mixed feelings about carb and starch substitutes. Unless whatever you're eating with the cauliflower rice is really flavorful, I don't think it passes for regular rice. However, while not really rice, I love this cauliflower on its own merits. It's really simple: sauteed onions, garlic, and salt are all you need. M even eats it and he is a traditional rice devotee.

Cauliflower rice and chicken meatballs are extra flavorful with tons of aromatics and high heat cooking for a quick, easy meal that can be customized any way you like. #meandthemoose #cauliflowerrice #chickenmeatballs #dinner #banhmirecipes

Cauliflower rice and chicken meatballs are extra flavorful with tons of aromatics and high heat cooking for a quick, easy meal that can be customized any way you like. #meandthemoose #cauliflowerrice #chickenmeatballs #dinner #banhmirecipes

Cauliflower rice and chicken meatballs are extra flavorful with tons of aromatics and high heat cooking for a quick, easy meal that can be customized any way you like. #meandthemoose #cauliflowerrice #chickenmeatballs #dinner #banhmirecipes

Cauliflower rice and chicken meatballs are extra flavorful with tons of aromatics and high heat cooking for a quick, easy meal that can be customized any way you like. #meandthemoose #cauliflowerrice #chickenmeatballs #dinner #banhmirecipes

Now, the meatballs. I have experimented A LOT with chicken meatballs. As a perfectionist, I really really want them to be round. I've gone down the rabbit hole of meatball-making tips and so far, none of them have been entirely successful. I've tried adding more and less filler, more and less liquid, more and less fat, cooking directly in a sauce, roasting, sauteing, and chilling in various ways. The most successful tip I can offer from my trials and tribulations is that making them very very small is the key to quick cooking and maintaining a round shape. So if you care about roundness in your meatballs, use 1 teaspoon or less per ball.

Cauliflower rice and chicken meatballs are extra flavorful with tons of aromatics and high heat cooking for a quick, easy meal that can be customized any way you like. #meandthemoose #cauliflowerrice #chickenmeatballs #dinner #banhmirecipes

Cauliflower rice and chicken meatballs are extra flavorful with tons of aromatics and high heat cooking for a quick, easy meal that can be customized any way you like. #meandthemoose #cauliflowerrice #chickenmeatballs #dinner #banhmirecipes

A couple of other notes:
- I've found that cheese is a better agent for adding moisture than milk because it doesn't make the mixture too slack. But while there is cheese in these balls, they don't taste cheesy at all, which makes the flavor more adaptable.
- I encourage you not to overcook these. Since there isn't a lot of fat or filler in these balls, they can dry out if left on the heat for too long. Using a meat thermometer is your best bet for cooking things fully, but not overdoing it.
-Speaking of cooking, I equally like roasting and sauteing these balls. I don't find that it makes a difference in the taste, texture, or shape of the final product. However, it's currently summer here on the east coast of the USA and hot as hell, so I don't always have it in me to turn on the oven. Either cooking method is great, so do what feels best (and least sweaty) for you.

Cauliflower rice and chicken meatballs are extra flavorful with tons of aromatics and high heat cooking for a quick, easy meal that can be customized any way you like. #meandthemoose #cauliflowerrice #chickenmeatballs #dinner #banhmirecipes

Cauliflower rice and chicken meatballs are extra flavorful with tons of aromatics and high heat cooking for a quick, easy meal that can be customized any way you like. #meandthemoose #cauliflowerrice #chickenmeatballs #dinner #banhmirecipes


Chicken meatball and cauliflower rice banh mi inspired bowl 

Time: 1 hour, 45 minutes (1 hour for the quick pickles, 45 active minutes for the prep and cooking)
Yield: 24-50 meatballs, depending on size; 4 cups cauliflower rice; 4 large bowls

Chicken meatballs
1 lb ground chicken
¾ cup panko
¼ cup grated parmesan
2 Tbsp full-fat ricotta (optional, as it may make the meatballs flatten slightly, but adds more moisture)
1 egg
½ tsp onion powder
½ tsp garlic powder
½ tsp kosher salt
pepper to taste

If roasting, preheat the oven to 425.

Combine all of the ingredients in a large bowl and mix minimally with a spoon, spatula, or your hands, just until the ingredients are incorporated.

If sautéing, add 1 Tablespoon of olive oil to a large pan and heat over a medium-low flame. 

Using wet hands, scoop out between 1 teaspoon (tiny) and 1 tablespoon (medium) of the chicken mixture and roll into a ball. Add to a baking dish or the hot pan.   

If sauteing: Over medium-high flame, brown on one side and then turn the meatballs over to brown on the other side (about 2-4 minutes per side, depending on the size of your meatballs). Turn the flame to low and cover the pan. Cook until a thermometer inserted reaches 165 degrees or the meatballs are firm when you press on them and no pink remains in the middle, about 4-8 more minutes, depending on size.

If roasting: Cook for 8-10 minutes (again, the larger your meatballs, the longer they’ll need to cook) and check the meatballs (again, they’re done when the internal temperature reaches 165 or the balls are firm and no pink remains in the center).
 

Cauliflower rice
1 Tbsp olive oil
½ small onion, chopped (a heaping ½ cup)
4 large cloves garlic, minced
1 lb cauliflower rice (either pre-riced or use a 1 lb [usually a small] head of cauliflower and chop in a food processor)
salt and pepper to taste

Heat the olive oil over a medium-low flame. Add the onions and sauté until translucent, about 5 minutes. Add the garlic and sauté until fragrant, about 2 minutes.

Add the cauliflower rice and sauté for 5 minutes. Reduce the flame to low, cover, and cook for 13-15 minutes or until you’ve reached your desired consistency. I like a little bit of crunch to the rice, so I prefer to cook for slightly less time.


Pickled carrots and daikon radish
Adapted from The Banh Mi Handbook
1 medium daikon (about 1 lb)
3 large carrots (about 1 lb)
1 teaspoon fine sea salt
1/4 cup granulated sugar
1 1/4 cups white vinegar
1 cup warm water

Chop your vegetables into thin sticks and add to a large container.

In a separate large liquid measuring cup, add the vinegar, water, sugar, and salt. Mix with a whisk and microwave on high for 30 seconds and whisk again. Repeat as needed, microwaving for 10-15 seconds at a time, to dissolve the sugar.

Pour over the chopped vegetables and refrigerate for at least one hour or up to one month.


For the rice bowls:
Meatballs (see recipe)
Cauliflower rice (see recipe)
Pickled vegetables (see recipe)
Fresh cilantro, torn from the bunch
Cucumber, sliced
Scallions, sliced
Sriracha or other hot sauce
Mayonnaise (optional)

To assemble the bowl, use as much or as little of each ingredient as you like. We usually get about two adult-sized portions and one kid-sized portion from the cauliflower rice with meatballs and pickles left over. If your family is larger, increase the rice as needed and adjust cooking times. Your onions and garlic may need another minute each and the overall cooking time for the cauliflower may be slightly longer as well (but test often after the above instructed 15 minutes to avoid overcooking).